一、为什么选择GitHub Actions
在2026年的DevOps实践中,CI/CD流水线已经成为现代软件开发的标准配置。根据最新的行业调研数据,超过78%的开源项目和63%的企业项目都在使用某种形式的自动化流水线。
GitHub Actions作为GitHub官方推出的自动化平台,在过去几年里快速迭代,已经成为开发者首选的CI/CD解决方案之一。相比传统的Jenkins,GitHub Actions无需额外部署服务器,配置简单直观,与GitHub仓库深度集成。
GitHub Actions的核心优势主要体现在三个方面。首先是原生集成体验,工作流的配置直接存在于仓库中,版本控制与流水线配置同步管理。其次是丰富的生态系统,GitHub Marketplace提供了超过一万个预构建actions。第三是灵活的定价策略,公开仓库完全免费,私有仓库每月提供2000分钟的免费运行时长。
二、GitHub Actions核心概念解析
在开始动手之前,我们需要理解GitHub Actions的几个核心概念。
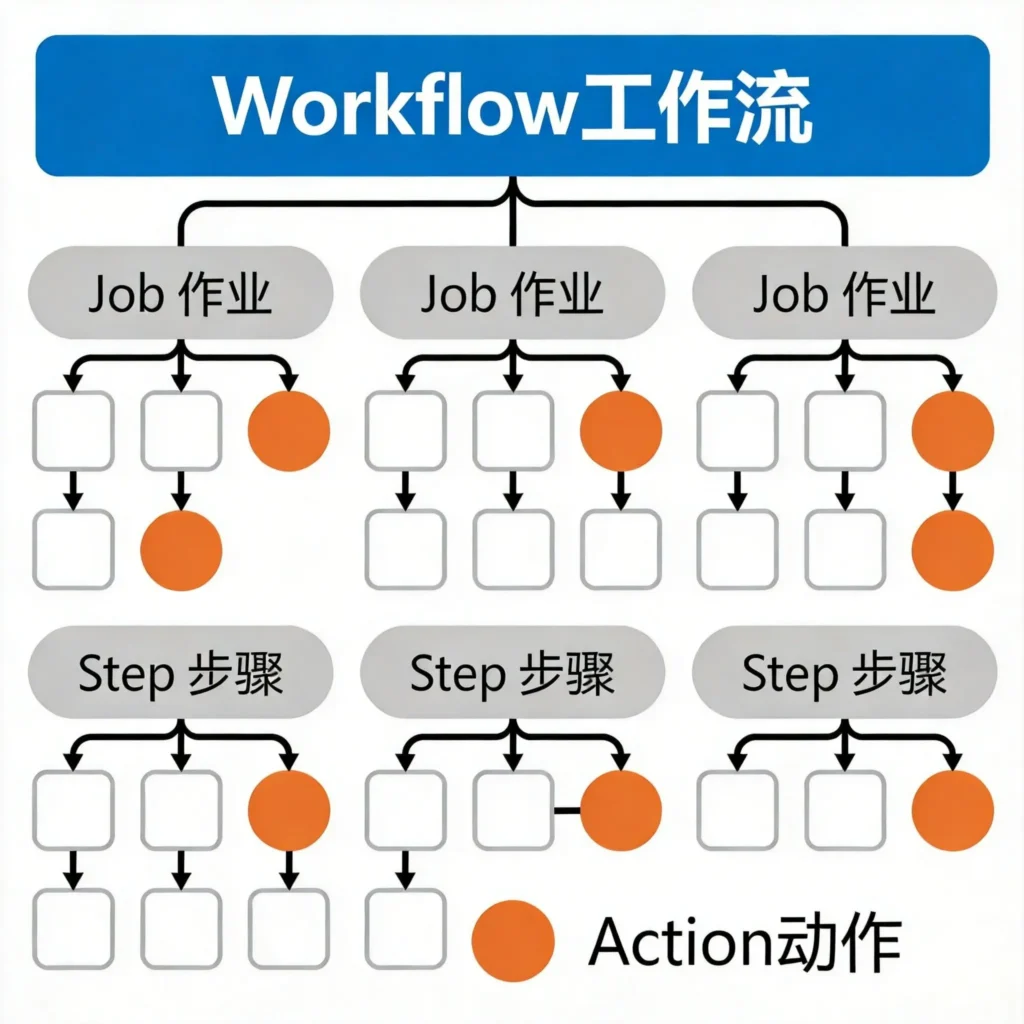
工作流(Workflow) 是自动化流程的顶层容器,定义在仓库的.github/workflows目录下的YAML文件中。每个工作流可以包含多个作业,由特定事件触发,比如代码推送、Pull Request创建、定时任务等。
作业(Job) 由一系列步骤组成,默认情况下同一个作业中的步骤会在同一台虚拟机上顺序执行。不同的作业可以配置为在不同的虚拟机上并行运行。作业之间可以设置依赖关系,只有当依赖的作业成功完成后才会开始执行。
步骤(Step) 是作业中的最小执行单元,可以是运行shell命令、使用预定义的action,或者运行脚本。步骤之间共享同一个工作目录。
动作(Action) 是GitHub Actions生态系统的核心组件,它是可重用的功能单元。官方维护的actions如actions/checkout、actions/setup-node等是构建流水线时最常用的基础组件。
运行器(Runner) 是执行工作流的服务器。GitHub提供了托管的运行器,包括Ubuntu Linux、Windows和macOS多个版本。
三、第一个CI/CD流水线实战
让我们从最简单的场景开始,手把手搭建一个Node.js项目的CI流水线。
首先在项目根目录下创建.github/workflows目录,然后创建第一个工作流文件ci.yml:
yaml
name: Node.js CI

on:
  push:
    branches: [ main, develop ]
  pull_request:
    branches: [ main ]

jobs:
  test:
    runs-on: ubuntu-latest

    strategy:
      matrix:
        node-version: [18, 20, 22]

    steps:
    - name: Checkout repository
      uses: actions/checkout@v4

    - name: Setup Node.js ${{ matrix.node-version }}
      uses: actions/setup-node@v4
      with:
        node-version: ${{ matrix.node-version }}
        cache: 'npm'

    - name: Install dependencies
      run: npm ci

    - name: Run linter
      run: npm run lint

    - name: Run type check
      run: npm run type-check

    - name: Run tests
      run: npm test

    - name: Upload test results
      uses: actions/upload-artifact@v4
      if: ${{ always() }}
      with:
        name: test-results-${{ matrix.node-version }}
        path: test-results/
这个配置展示了GitHub Actions的几个关键特性。on字段定义了触发条件。strategy.matrix定义了一个构建矩阵,同时测试三个Node.js版本。cache参数启用了npm依赖缓存,可以显著加快后续构建速度。
四、企业级CI/CD流水线架构
在实际项目中,CI/CD流水线通常比上面的示例复杂得多。让我们构建一个更加完整的前后端项目流水线:
yaml
name: Full CI/CD Pipeline

on:
  push:
    branches: [ main ]
  pull_request:
    branches: [ main ]

permissions:
  contents: read
  pull-requests: write

env:
  REGISTRY: ghcr.io
  IMAGE_NAME: ${{ github.repository }}

jobs:
  # 代码质量检查
  lint:
    runs-on: ubuntu-latest
    steps:
      - uses: actions/checkout@v4
      - name: Run ESLint
        run: npm run lint
      - name: Run Prettier check
        run: npm run format:check

  # 安全扫描
  security:
    runs-on: ubuntu-latest
    steps:
      - uses: actions/checkout@v4
      - name: Run npm audit
        run: npm audit --audit-level=high

  # 单元测试与集成测试
  test:
    runs-on: ubuntu-latest
    needs: [lint, security]

    services:
      postgres:
        image: postgres:16
        env:
          POSTGRES_USER: testuser
          POSTGRES_PASSWORD: testpass
          POSTGRES_DB: testdb
        ports:
          - 5432:5432

    steps:
      - uses: actions/checkout@v4
      - name: Setup Node.js
        uses: actions/setup-node@v4
        with:
          node-version: '20'
          cache: 'npm'
      - name: Install dependencies
        run: npm ci
      - name: Run tests
        run: npm test

  # 构建Docker镜像
  build:
    runs-on: ubuntu-latest
    needs: [test]
    outputs:
      image-tag: ${{ steps.meta.outputs.tags }}

    steps:
      - uses: actions/checkout@v4
      - name: Set up Docker Buildx
        uses: docker/setup-buildx-action@v3
      - name: Log in to Container Registry
        uses: docker/login-action@v3
        with:
          registry: ${{ env.REGISTRY }}
          username: ${{ github.actor }}
          password: ${{ secrets.GITHUB_TOKEN }}
      - name: Extract metadata
        id: meta
        uses: docker/metadata-action@v5
        with:
          images: ${{ env.REGISTRY }}/${{ env.IMAGE_NAME }}
      - name: Build and push
        uses: docker/build-push-action@v5
        with:
          context: .
          push: ${{ github.event_name != 'pull_request' }}
          tags: ${{ steps.meta.outputs.tags }}
          cache-from: type=gha
          cache-to: type=gha,mode=max

  # 部署到测试环境
  deploy-staging:
    runs-on: ubuntu-latest
    needs: [build]
    if: github.event_name == 'push'

    environment:
      name: staging
      url: https://staging.example.com

    steps:
      - uses: actions/checkout@v4
      - name: Deploy to Kubernetes
        uses: azure/k8s-deploy@v4
        with:
          namespace: staging
          manifests: |
            k8s/deployment.yaml
            k8s/service.yaml

  # 生产环境部署
  deploy-production:
    runs-on: ubuntu-latest
    needs: [deploy-staging]
    if: github.ref == 'refs/heads/main'

    environment:
      name: production
      url: https://example.com

    steps:
      - uses: actions/checkout@v4
      - name: Deploy to production
        uses: azure/k8s-deploy@v4
        with:
          namespace: production
          manifests: |
            k8s/deployment.yaml
            k8s/service.yaml
          images: |
            ${{ needs.build.outputs.image-tag }}
这个流水线展示了企业级CI/CD的完整架构。各个作业之间通过needs关键字建立了依赖关系,确保只有通过前置检查的代码才能进入下一个阶段。environment配置不仅设置了环境URL,还在GitHub界面中创建了部署审批流程。
五、缓存优化与性能提升
CI/CD流水线的执行效率直接影响开发体验。GitHub Actions提供了多种缓存机制来优化构建性能。
npm依赖缓存是最常见的优化场景:
yaml
- name: Setup Node.js
  uses: actions/setup-node@v4
  with:
    node-version: '20'
    cache: 'npm'
对于更复杂的缓存需求,可以使用actions/cache:
yaml
- name: Cache pip packages
  uses: actions/cache@v4
  with:
    path: ~/.cache/pip
    key: ${{ runner.os }}-pip-${{ hashFiles(' **/requirements.txt') }}
    restore-keys: |
      ${{ runner.os }}-pip-
Docker构建缓存可以大幅提升镜像构建速度:
yaml
- name: Build and push
  uses: docker/build-push-action@v5
  with:
    cache-from: type=gha
    cache-to: type=gha,mode=max
矩阵策略可以最大化并行执行效率:
yaml
strategy:
  matrix:
    python-version: ['3.10', '3.11', '3.12']
    db: ['postgres:14', 'postgres:15', 'postgres:16']
  fail-fast: false
六、安全配置最佳实践
CI/CD流水线涉及敏感操作,安全配置至关重要。
permissions字段可以精确控制工作流可以访问的权限:
yaml
permissions:
  contents: read
  pull-requests: write
  statuses: write
对于需要访问云资源的场景,应使用OpenID Connect(OIDC)进行身份验证:
yaml
- name: Configure AWS credentials
  uses: aws-actions/configure-aws-credentials@v4
  with:
    role-to-assume: arn:aws:iam::123456789012:role/github-actions
    aws-region: us-east-1
秘密信息应存储在GitHub仓库的Secrets中:
yaml
- name: Deploy
  run: ./deploy.sh
  env:
    API_KEY: ${{ secrets.API_KEY }}
    DATABASE_URL: ${{ secrets.DATABASE_URL }}
对于敏感操作的审批,可以使用environment protection rules:
yaml
environment:
  name: production
  deployment_job_policy: custom
  protection_rules:
    - required_reviewers:
        - senior-dev@example.com
      wait_timer: 30
七、常见问题与解决方案
构建超时是最常见的问题之一:
yaml
- name: Long running task
  run: ./slow-task.sh
  timeout-minutes: 30
环境变量传递可以使用outputs:
yaml
jobs:
  build:
    runs-on: ubuntu-latest
    outputs:
      image-tag: ${{ steps.meta.outputs.tags }}
    steps:
      - id: meta
        run: echo "tags=my-image:$(date +%Y%m%d)" >> $GITHUB_OUTPUT

  deploy:
    runs-on: ubuntu-latest
    needs: build
    steps:
      - run: echo "Deploying ${{ needs.build.outputs.image-tag }}"
八、总结
GitHub Actions已经成为现代软件开发不可或缺的工具。通过本文的学习,你应该已经掌握了GitHub Actions的核心概念,能够搭建基础的CI流水线,理解企业级流水线的架构设计,并学会使用缓存优化和安全配置等进阶技巧。
建议从小处着手,先建立基础的测试自动化,然后逐步添加构建、部署、监控等环节,最终形成适合团队的完整流水线。持续集成不仅仅是技术实践,更是一种团队文化的体现。
附录:完整配置模板
Node.js项目CI模板
yaml
name: Node.js CI
on: [push, pull_request]
jobs:
  test:
    runs-on: ubuntu-latest
    strategy:
      matrix:
        node-version: [18, 20]
    steps:
    - uses: actions/checkout@v4
    - uses: actions/setup-node@v4
      with:
        node-version: ${{ matrix.node-version }}
        cache: 'npm'
    - run: npm ci
    - run: npm test
Python项目CI模板
yaml
name: Python CI
on: [push, pull_request]
jobs:
  test:
    runs-on: ubuntu-latest
    steps:
    - uses: actions/checkout@v4
    - uses: actions/setup-python@v5
      with:
        python-version: '3.11'
        cache: 'pip'
    - run: pip install -r requirements.txt
    - run: pytest
Docker镜像构建模板
yaml
name: Build and Push Docker Image
on:
  push:
    branches: [main]
    tags: ['v*']
jobs:
  build:
    runs-on: ubuntu-latest
    steps:
    - uses: actions/checkout@v4
    - uses: docker/setup-buildx-action@v3
    - uses: docker/login-action@v3
      with:
        registry: ghcr.io
        username: ${{ github.actor }}
        password: ${{ secrets.GITHUB_TOKEN }}
    - uses: docker/metadata-action@v5
      id: meta
      with:
        images: ghcr.io/${{ github.repository }}
        tags: type=semver,pattern={{version}}
    - uses: docker/build-push-action@v5
      with:
        push: true
        tags: ${{ steps.meta.outputs.tags }}
术语表
表格
| 术语 | 英文 | 说明 |
|---|---|---|
| 工作流 | Workflow | 定义在YAML文件中的自动化流程 |
| 作业 | Job | 工作流中的独立执行单元 |
| 步骤 | Step | 作业中的具体操作步骤 |
| 动作 | Action | 可重用的功能组件 |
| 运行器 | Runner | 执行工作流的服务器 |
| 矩阵 | Matrix | 多维度并行测试策略 |
| 制品 | Artifact | 构建过程中产生的文件 |
发表回复